离线部署 Openshift Container Platform 4.3 - 2: 初始安装

本文记录了离线环境下以 UPI (User Provisioned Infrastructure) 模式初始安装 OCP 4.3.5 集群的步骤, 包括地址/DNS 名称规划, DHCP, 负载均衡配置, ignition 文件生成, 到最后的集群部署.

IaaS 平台为 VMware vSphere 6.7U2. DDI 方案使用 Infoblox NIOS. 负载均衡方案使用 HAProxy

DNS 及 IP 地址规划

DNS 记录 类型 说明
ocp-bootstrap.int.vopsdev.com A 192.168.11.119 bootstrap 节点. A 记录对应的 PTR 记录也同时创建出来, 下同
ocp-node-0.int.vopsdev.com A 192.168.11.120 master 节点
ocp-node-1.int.vopsdev.com A 192.168.11.121 master 节点
ocp-node-2.int.vopsdev.com A 192.168.11.122 master 节点
ocp-node-3.int.vopsdev.com A 192.168.11.123 worker 节点
ocp-node-4.int.vopsdev.com A 192.168.11.124 worker 节点
ocp-node-5.int.vopsdev.com A 192.168.11.125 worker 节点
api.ocp.vopsdev.com CNAME lb-if-192-168-11-249.int.vopsdev.com 别名, 指向现有的 LB 记录
api-int.ocp.vopsdev.com CNAME lb-if-192-168-11-249.int.vopsdev.com 如果有需要, api 和 api-int 可以分别指向内部/外部 LB
*.apps.ocp.vopsdev.com CNAME lb-if-192-168-11-249.int.vopsdev.com
etcd-0.ocp.vopsdev.com CNAME ocp-node-0.int.vopsdev.com
etcd-1.ocp.vopsdev.com CNAME ocp-node-1.int.vopsdev.com
etcd-2.ocp.vopsdev.com CNAME ocp-node-2.int.vopsdev.com
_etcd-server-ssl._tcp.ocp.vopsdev.com SRV 0 10 2380 etcd-0.ocp.vopsdev.com
_etcd-server-ssl._tcp.ocp.vopsdev.com SRV 0 10 2380 etcd-1.ocp.vopsdev.com
_etcd-server-ssl._tcp.ocp.vopsdev.com SRV 0 10 2380 etcd-2.ocp.vopsdev.com

DHCP

所有 OCP 节点都通过 DHCP 自动获取 IP. DHCP 上做预留 (在 Infoblox 里叫 fixed address), 确保每个节点都可以获取预先规划的地址.

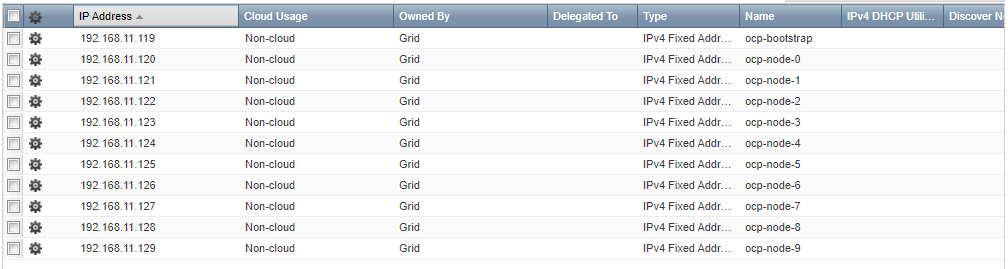
由于节点 MAC 地址要在虚拟机部署之后才能确定, 这里先随便填写. 后面部署节点时会通过 Infoblox API 动态更新 fixed address 记录的 MAC 字段.

负载均衡

负载均衡器目前使用是 HAProxy, 简单写几个四层 LB 配置

1
2
3
4
5
6
7
8
9
10
11
12
13
14
15
16
17
18
19
20
21
22
23
24
25
26
27
28
29
30
31
32
33
34
35
36
37
38
39
40
41
42
43
44
45
46
47
48
49
50
51
52
53
frontend vs_ocp_master_6443
mode tcp
option tcplog
bind 192.168.11.249:6443
default_backend pl_ocp_master_6443

frontend vs_ocp_master_22623
mode tcp
option tcplog
bind 192.168.11.249:22623
default_backend pl_ocp_master_22623

frontend vs_ocp_router_80
mode tcp
option tcplog
bind 192.168.11.249:80
default_backend pl_ocp_router_80

frontend vs_ocp_router_443
mode tcp
option tcplog
bind 192.168.11.249:443
default_backend pl_ocp_router_443

backend pl_ocp_master_6443
mode tcp
balance source
server ocp-node-0 ocp-node-0.int.vopsdev.com:6443 check
server ocp-node-1 ocp-node-1.int.vopsdev.com:6443 check
server ocp-node-2 ocp-node-2.int.vopsdev.com:6443 check
server ocp-bootstrap ocp-bootstrap.int.vopsdev.com:6443 check

backend pl_ocp_master_22623
mode tcp
balance source
server ocp-node-0 ocp-node-0.int.vopsdev.com:22623 check
server ocp-node-1 ocp-node-1.int.vopsdev.com:22623 check
server ocp-node-2 ocp-node-2.int.vopsdev.com:22623 check
server ocp-bootstrap ocp-bootstrap.int.vopsdev.com:22623 check

backend pl_ocp_router_80
mode tcp
balance source
server ocp-node-3 ocp-node-3.int.vopsdev.com:80 check
server ocp-node-4 ocp-node-4.int.vopsdev.com:80 check
server ocp-node-5 ocp-node-5.int.vopsdev.com:80 check

backend pl_ocp_router_443
mode tcp
balance source
server ocp-node-3 ocp-node-3.int.vopsdev.com:443 check
server ocp-node-4 ocp-node-4.int.vopsdev.com:443 check
server ocp-node-5 ocp-node-5.int.vopsdev.com:443 check

准备 ignition 文件

编写 install-config.yaml

根据环境的实际情况编写 install-config.yaml. 下面是我的实验环境所使用的版本

1
2
3
4
5
6
7
8
9
10
11
12
13
14
15
16
17
18
19
20
21
22
23
24
25
26
27
28
29
30
31
32
33
34
35
36
37
38
39
40
41
apiVersion: v1
baseDomain: vopsdev.com
compute:
- hyperthreading: Enabled
name: worker
replicas: 0
controlPlane:
hyperthreading: Enabled
name: master
replicas: 3
metadata:
name: ocp
platform:
vsphere:
vcenter: vc.int.vopsdev.com
username: xxx
password: xxx
datacenter: HDC
defaultDatastore: DS-SHARED
fips: false
networking:
networkType: OpenShiftSDN
clusterNetworks:
- cidr: 10.9.0.0/20
hostPrefix: 24
serviceNetwork:
- 172.16.0.0/20
sshKey: 'ssh-rsa ...'
additionalTrustBundle: |
-----BEGIN CERTIFICATE-----
...
-----END CERTIFICATE-----
imageContentSources:
- mirrors:
- quay.svc.vopsdev.com/openshift-release-dev/ocp-v4.0-art-dev
source: quay.io/openshift-release-dev/ocp-release
- mirrors:
- quay.svc.vopsdev.com/openshift-release-dev/ocp-v4.0-art-dev
source: quay.io/openshift-release-dev/ocp-v4.0-art-dev
pullSecret: '{"auths":{...}}'

一些注释

  • metadata.name + baseDomain 组成集群的基础域名, 这里是 ocp.vopsdev.com
  • 需要在 vSphere Datacenter 下按照 metadata.name 建立一个虚拟机目录, 将来创建 vSphere 动态卷需要, 具体原因看这里. 然而你并不需要将 OCP 节点放到这个虚拟机目录下
  • platform 下的 vcenter 信息主要用于动态卷的创建, 确保这个用户有足够的权限, 具体看这里
  • 我的环境有私有 PKI, 所有的服务器证书由二级 CA 签发, 因此把根 CA 的证书放到 additionalTrustBundle 里, 确保所有 OCP 节点信任私有根 CA
  • imageContentSources 来自前面oc adm release mirror 的输出结果
  • 我的 quay 私有镜像库不允许匿名拉取, 因此提供了 pullSecret

生成 ignition

1
2
3
4
5
6
7
8
9
10
11
12
13
14
15
16
17
18
19
20
21
22
23
24
25
26
27
28
29
30
31
32
33
34
35
36
37
38
39
40
41
42
43
44
45
46
47
48
49
50
51
52
53
54
55
56
57
58
59
60
61
62
63
64
65
66
67
68
69
70
71
72
73
74
75
76
77
78
79
80
81
82
83
84
85
rm -rf assets; mkdir assets
cp install-config.yaml assets/
./openshift-install create manifests --dir=assets
sed -i 's/mastersSchedulable: true/mastersSchedulable: false/' assets/manifests/cluster-scheduler-02-config.yml

# 配置一下时间同步服务. 我这里两个 ntp 服务器是 192.168.11.2 和 192.168.255.249
chrony_config=$(echo -n "server 192.168.11.2 iburst
server 192.168.255.249 iburst
driftfile /var/lib/chrony/drift
makestep 1.0 3
rtcsync
logdir /var/log/chrony" | base64 -w0)

cat > assets/openshift/99_master-chrony.yaml <<EOF
apiVersion: machineconfiguration.openshift.io/v1
kind: MachineConfig
metadata:
labels:
machineconfiguration.openshift.io/role: master
name: 50-vopsdev-master-chrony
spec:
config:
ignition:
version: 2.2.0
storage:
files:
- contents:
source: data:text/plain;charset=utf-8;base64,$chrony_config
filesystem: root
mode: 0644
path: /etc/chrony.conf
EOF

cat > assets/openshift/99_worker-chrony.yaml <<EOF
apiVersion: machineconfiguration.openshift.io/v1
kind: MachineConfig
metadata:
labels:
machineconfiguration.openshift.io/role: worker
name: 50-vopsdev-worker-chrony
spec:
config:
ignition:
version: 2.2.0
storage:
files:
- contents:
source: data:text/plain;charset=utf-8;base64,$chrony_config
filesystem: root
mode: 0644
path: /etc/chrony.conf
EOF

# 生成 ignition 配置
./openshift-install create ignition-configs --dir=assets

# 跳板机上运行了 httpd, 提供静态文件服务
# 后面节点可以通过 http://static.svc.vopsdev.com/ocp/bootstrap.ign 下载
sudo cp -f assets/bootstrap.ign /var/www/static/ocp/

cat > ./assets/append-bootstrap.ign <<EOF
{
"ignition": {
"config": {
"append": [
{
"source": "http://static.svc.vopsdev.com/ocp/bootstrap.ign",
"verification": {}
}
]
},
"timeouts": {},
"version": "2.1.0"
},
"networkd": {},
"passwd": {},
"storage": {},
"systemd": {}
}
EOF

# base64 编码的 ignition
base64 -w0 assets/master.ign > assets/master.64
base64 -w0 assets/worker.ign > assets/worker.64
base64 -w0 assets/append-bootstrap.ign > assets/append-bootstrap.64

部署节点

对于 vSphere 环境下的部署, ignition 数据需要通过 guestinfo.ignition.config.data 虚拟机属性注入, 手工操作显然不可接受. 我这里采用的方法是 ovftool + govc. 用 ansible 或者 terraform 之类应该也可以做, 但是在这儿显得杀鸡用牛刀了

1
2
3
4
5
6
7
8
9
10
11
12
13
14
15
16
17
18
19
20
21
22
23
24
25
26
27
28
29
30
31
32
33
34
35
36
37
38
39
40
41
42
43
44
45
46
47
48
49
50
51
52
53
54
55
56
57
58
59
60
61
62
63
64
65
66
67
68
69
70
71
72
73
74
75
76
77
78
79
80
81
82
83
84
85
86
87
88
89
90
91
92
93
94
95
96
97
BOOTSTRAP_B64_CONF="$(cat assets/append-bootstrap.64)"
MASTER_B64_CONF="$(cat assets/master.64)"
WORKER_B64_CONF="$(cat assets/worker.64)"
RHCOS_OVA="/mnt/driver/RedHat/openshift-4.3/rhcos-4.3.0-x86_64-vmware.ova"
USER='administrator@vsphere.local'
PASS='xxx'
VC="vc.int.vopsdev.com"
VMFOLDER="Lab/OCP"
NETWORK="SG-SVC-11"
DATASTORE="DS-SHARED"

# infoblox api access
IBUSER="xxx"
IBPASS="xxx"
IBAPI_BASE="https://infoblox.int.vopsdev.com/wapi/v2.1"

export GOVC_URL="$USER:$PASS@$VC"
export GOVC_DATACENTER=HDC

OCP_MASTERS=()
OCP_WORKERS=()

# bootstrap node: 4 vCPU + 16G RAM
VM="ocp-bootstrap"
ovftool --vmFolder="$VMFOLDER" --datastore="$DATASTORE" --diskMode="thin" --net:"VM Network"="$NETWORK" --name="$VM" --numberOfCpus:'*'=4 --memorySize:'*'=16384 --allowExtraConfig --extraConfig:disk.EnableUUID=true --extraConfig:guestinfo.ignition.config.data.encoding="base64" --extraConfig:guestinfo.ignition.config.data="$BOOTSTRAP_B64_CONF" $RHCOS_OVA "vi://$USER:$PASS@$VC/HDC/host/compute-cluster"
govc vm.disk.change -vm $VM -disk.label "Hard disk 1" -size 120G

# master nodes: 4 vCPU + 16G RAM
for idx in 0 1 2; do
VM="ocp-node-$idx"
ovftool --vmFolder="$VMFOLDER" --datastore="$DATASTORE" --diskMode="thin" --net:"VM Network"="$NETWORK" --name="$VM" --numberOfCpus:'*'=4 --memorySize:'*'=16384 --allowExtraConfig --extraConfig:disk.EnableUUID=true --prop:guestinfo.ignition.config.data.encoding="base64" --prop:guestinfo.ignition.config.data="$MASTER_B64_CONF" $RHCOS_OVA "vi://$USER:$PASS@$VC/HDC/host/compute-cluster"
govc vm.disk.change -vm $VM -disk.label "Hard disk 1" -size 120G
OCP_MASTERS=("${OCP_MASTERS[@]}" $VM)
done

# worker nodes: 4 vCPU + 32G RAM
for idx in 3 4 5; do
VM="ocp-node-$idx"
ovftool --vmFolder="$VMFOLDER" --datastore="$DATASTORE" --diskMode="thin" --net:"VM Network"="$NETWORK" --name="$VM" --numberOfCpus:'*'=4 --memorySize:'*'=32768 --allowExtraConfig --extraConfig:disk.EnableUUID=true --prop:guestinfo.ignition.config.data.encoding="base64" --prop:guestinfo.ignition.config.data="$WORKER_B64_CONF" $RHCOS_OVA "vi://$USER:$PASS@$VC/HDC/host/compute-cluster"
govc vm.disk.change -vm $VM -disk.label "Hard disk 1" -size 120G
OCP_WORKERS=("${OCP_WORKERS[@]}" $VM)
done

# 根据新的 mac 地址, 更新 dhcp fixed address 记录
ALL_NODES=(ocp-bootstrap "${OCP_MASTERS[@]}" "${OCP_WORKERS[@]}")
for node in "${ALL_NODES[@]}"; do
mac=$(govc device.info -vm $node -json ethernet-0 | jq -r .Devices[].MacAddress)
ip=$(host $node | cut -d' ' -f4)
echo "$node: $ip, $mac"
api_path=$(curl -s -k -u $IBUSER:$IBPASS -H "Content-Type: application/json" -X GET "$IBAPI_BASE/fixedaddress?ipv4addr=$ip" | jq -r '.[] | ._ref')
curl -s -k -u $IBUSER:$IBPASS -H "Content-Type: application/json" -X PUT "$IBAPI_BASE/${api_path}" -d "{\"mac\":\"$mac\"}" > /dev/null
done

# 必要时 reload infoblox DHCP 服务
grid_path=$(curl -s -k -u $IBUSER:$IBPASS -H "Content-Type: application/json" "$IBAPI_BASE/grid" | jq -r '.[] | ._ref')
curl -s -k -u $IBUSER:$IBPASS -H "Content-Type: application/json" -X POST "$IBAPI_BASE/${grid_path}?_function=restartservices" -d '{"member_order":"SIMULTANEOUSLY","restart_option":"RESTART_IF_NEEDED","service_option":"DHCP"}'

# 启动 bootstrap
govc vm.power -on "ocp-bootstrap"

# 观察负载均衡器, 下面两个没问题了再进行下去
# curl -v -k https://api-int.ocp.vopsdev.com:22623/config/master
# curl -v -k https://api-int.ocp.vopsdev.com:22623/config/worker

# 启动所有 master 节点. 节点会去 bootstrap 上下载配置
for node in "${OCP_MASTERS[@]}"; do
govc vm.power -on $node
done

# 观察负载均衡器, 3 个 master 都起来了再进行下去
# curl -v -k https://api-int.ocp.vopsdev.com:22623/config/master
# curl -v -k https://api-int.ocp.vopsdev.com:22623/config/worker

# 启动所有 worker 节点. 节点会去 master 上下载配置
for node in "${OCP_WORKERS[@]}"; do
govc vm.power -on $node
done

# 到这儿这步一般已经结束了
./openshift-install --dir=assets wait-for bootstrap-complete --log-level=debug

export KUBECONFIG='./assets/auth/kubeconfig'
oc whoami
oc version

# 如果有 pending 的证书请求就批准
oc get csr
oc get csr -o json | jq -r '.items[] | select(.status == {} ) | .metadata.name' | xargs oc adm certificate approve

# 等待 worker 节点起来, 确保所有节点都是 Ready
oc get nodes

# 等所有 cluster operator 状态 AVAILABLE: TRUE
oc get clusteroperators

# 等待安装结束, 获取集群管理员密码
./openshift-install --dir=assets wait-for install-complete

使用集群管理员 kubeadmin 登录 web console

至此集群初步搭建完成, 后面将针对各个基础服务进行完善.